
Mak-kimchi 막김치
Years ago, my wife and I stayed overnight in Seoul on the way home from New Zealand. An amazing array of types of kimchi accompanied breakfast the following morning; and from then on, I was hooked on this Korean staple. For the last few years, I’ve gradually honed my kimchi-making skills. For simplicity, I tend to make mak-kimchi which means “roughly made kimchi.” In traditional kimchi, who cabbages are fermented intact (though usually split in half to permit the salt and later, spices to enter between the leaves.) However, getting the cabbages properly salted it very tricky and often neglected. So instead of making the more traditional kimchi, I’ve specialized in mak-kimchi. The main difference is in the way that the cabbages are handled. In this case, the cabbages are slided into approximately bite-sized pieces then salted, wilted, rinsed, mixed with the spices and allowed to ferment.
I’m not expert in kimchi-making though I’ve made it many times. Instead, I’d like to point out a few things that I’ve learned from using and adapting different recipes. My current version is somewhere between the following two:
You should feel free to follow either of the two recipes. For now, I’ll just highlight some of the issues involved.
Salting
For mak kimchi, the salting process isn’t quite as difficult and tricky as with traditional whole-cabbage kimchi. It is said that ordinary table salt is inadequate to properly wilt the cabbage. This is true of whole-cabbage kimchi; but I’m not sure about mak kimchi. Assuming that it is, I use crystalline Korean sea salt. If you have a Korean grocery nearby, you will find it there. I found my initial supply on Amazon.
Some recipes suggest sprinkling the crystalline salt between layers of leaves in the colander. From my experience, very little wilting occurs this way. The reason is obvious. There’s just not enough moisture to dissolve the salt and allow it to work. Therefore, both of the recipes mentioned earlier advise making a concentrated brine solution and pouring it over the leaves. I agree completely with this approach because you get much more complete and uniform wilting.
A few pieces of advice about this process:
- Pour the bring solution very slowly over the leaves. If you pour too quickly, the liquid will run off and fail to cover the leaves.
- You need to turn the leaves over and mix immediately after pouring the brine.
- To keep the uniformity of the process, turn the leaves thoroughly every 30 minutes.
- About 2 hours is enough salt exposure for mak kimchi. Or you can use the stiff white leaves as a guide. When they are rubbery and bendable, the salting can be concluded.
- After washing off the salt solution (3 times is authentic) the leaves must be dried very thoroughly. Otherwise, the spices don’t adhere properly.
Mixing leaves and spices
I’ve made kimchi with a rice porridge base and without it. I think it is better with the porridge because of the action that the porridge has on the initial adherence of the spice mixture to the leaves. The recipe at Maanchi.com advises a porridge but the one at Korean Bapsang does not. It’s very easy to make and I believe that it does promote a more cohesive mixture at least initially before the fermentation process gradually breaks everything down and dilutes it.
Proportions
The cabbages I’ve used come in so many sizes that it’s hard to get a fix on the proportions. Although I have not yet done so, I think it makes sense to weigh the cabbages and work out a proportion for certain ingredients like the fish sauce, and ferment salted shrimp. (Korean Bapsang uses salted shrimp and Maanchi uses salted squid.) Controlling the amount of salt in the finished kimchi is difficult since we’re adding salt in the form of salted shrimp or squid along with fish sauce. I’ve come to the conclusion that you simply have to do it on the basis of taste. For that reason, reserving some of the salted fish and fish sauce to adjust at the end makes sense. On the subject of fish, although we are mostly vegetarian, consuming fish rarely, I’ve compromised on the topic of kimchi although there are vegetarian recipes around.
Fermentation equipment
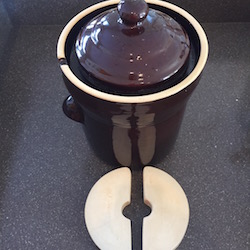
The fermentation needs to occur in an air-tight container. I use Harsch water-seal ceramic crocks for the fermentation. I have both a large and a medium crock. I saw recently that Harsch no longer makes these crocks.However, there appear to be many other suppliers that produce a similar product. The medium gets most of the use because it easily holds the amount of ingredients from two cabbages. Both were purchased from Amazon. Be sure to buy the weighting stones. These are essential for keeping everything pushed down so there are no air pockets inside. The traditional vessel for fermenting kimchi are onggi (옹기). Unfortunately, I haven’t been able to find traditional onggi either in the U.S. or Canada; but since I’m satisfied with the German-made crocks that I use, I have not looked very thoroughly. One final note about loading the fermentation crock. Be cautious about overloading it because you will struggle to get the pressing stones into the crock due to lack of space. If you first compact the kimchi with your hands you’ll have a little more room. You’ll nearly the height of the stones to wiggle them into the crock.
Fermentation process
I prefer fairly well-fermented kimchi; but tastes vary. Currently, I’m leaving the fermentation crock out in the kitchen for three days. As the fermentation gases build up in the pot, you will hear a characteristic “plop” as the pressure overcomes the water-seal. After the room temperature fermentation, I put it in the root cellar if available for another day, then into the refrigerator. After a total of a week under water-seal, I remove it from the crock and store it sealed in ordinary storage containers in the refrigerator.
At some point I need to document my actual recipe since it is somewhat uniquely positioned between the two referenced versions.