Programming the Raspberry Pi in ARM assembly language
A textbook on programming the RPi in assembly language. This is brilliant.
A textbook on programming the RPi in assembly language. This is brilliant.
The Si7021is an excellent little device for measuring temperature and humidity, communicating with the host controller over the I2C bus. This is a quick tutorial on using the Raspberry Pi to talk to this device. If you are unfamiliar with the conceptual framework of I2C or how to enable I2C access on the Raspberry Pi, I suggest starting here. Otherwise, let’s jump in.
You are probably working with the device mounted on a breakout board. I used this one from Adafruit. There are no surprises on the pins that it breaks out - Vin, 3v out, GND, SCL and SDA. One the 40-pin P1 header of the Raspberry Pi, SDA and SCL for I2C bus 1 occupy pins 2 and 3.
I recently wrote about using the excellent bcm2835 library to communicate with peripheral devices over the SPI bus using C. In this post, I’ll talk about using the same library to communicate over the I2C bus. Nothing particularly fancy, but you’ll need to pay careful attention to the datasheet of the device we’re using. TheTSL2561 is a sophisticated little light sensor that has a very high dynamic range and is available on a breakout board from Adafruit. I’m not going to delve into the hookup of this device as you can take a look at the Adafruit tutorial for that. Note that we’re not going to use their library. (Well, I borrowed a bunch of their #define statements for device constants.)
Several years ago I wrote about adding analog-to-digital capabilities to the Raspberry Pi. At that time, I used an ATtinyx61 series MCU to provide ADC capabilities, communicating with the RPi via an I2C interface. In retrospect it was much more complicated than necessary. What follows is an attempt to re-do that project using an MCP3008, a 10 bit ADC that communicates on the SPI bus.
The MCP3008 is an 8-channel 10-bit ADC with an SPI interface^[Datasheet can be found here.]. It has a 4 channel cousin, the MCP3004 that has similar operating characteristics. The device is capable of performing single-ended or differential measurements. For the purposes of this write-up, we’ll only concern ourselves with single-ended measurement. A few pertinent details about the MCP3008:
Yet another diversion to keep me from focusing on actually using Anki to learn Russian. I stumbled on the R programming language, a language that focuses on statistical analysis.
Here’s a couple snippets that begin to scratch the surface of what’s possible. Important caveat: I’m an R novice at best. There are probably much better ways of doing some of this…
Here we’ll use R to do what we did previously with Python.
Continuing my series on accessing the Anki database outside of the Anki application environment, here’s a piece on accessing the note type model. You may wish to start here with the first article on accessing the Anki database. This is geared toward mac OS. (If you’re not on mac OS, then start here instead.)
Since notes contain flexible fields in Anki, the model for a note type is in JSON. The best guess definition of the JSON is:
I previously wrote about accessing the Anki database using Python on mac OS. Extending that post, I’ll show how to work with a specific deck in this short post.
To use a named deck you’ll need its deck ID. Fortunately there’s a built-in method for finding a deck ID by name:
col = Collection(COLLECTION_PATH)
dID = col.decks.id(DECK_NAME)
Now in queries against the cards and notes tables we can apply the deck ID to restrict them to a certain deck. For example, to find all of the cards currently in the learning stage:
Not long ago I ran across this post detailing a method for opening and inspecting the Anki database using Python outside the Anki application environment. However, the approach requires linking to the Anki code base which is inaccessible on mac OS since the Python code is packaged into a Mac app on this platform.
The solution I’ve found is inelegant; but just involves downloading the Anki code base to a location on your file system where you can link to it in your code. You can find the Anki code here on github.
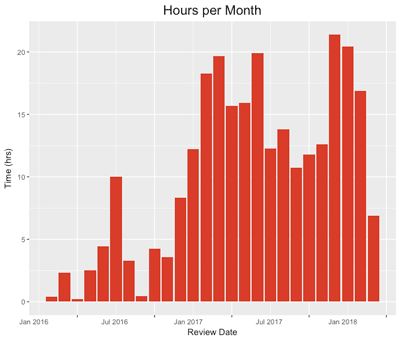
For the last two years, I’ve been working through a 10,000 word Russian vocabulary ordered by frequency. I have a goal of finishing the list before the end of 2019. This requires not only stubborn persistence but an efficient process of collecting the information that goes onto my Anki flash cards.
My manual process has been to work from a Numbers spreadsheet. As I collect information about each word from several websites, I log it in this table.